Frequently Asked Questions
How to start Jack Server for Pisound?
In case you don't have qjackctl installed, run:
sudo apt-get install qjackctl
- Run QJackCtl (either from the Applications->Sound & Video menu or executing 'qjackctl' in a terminal.
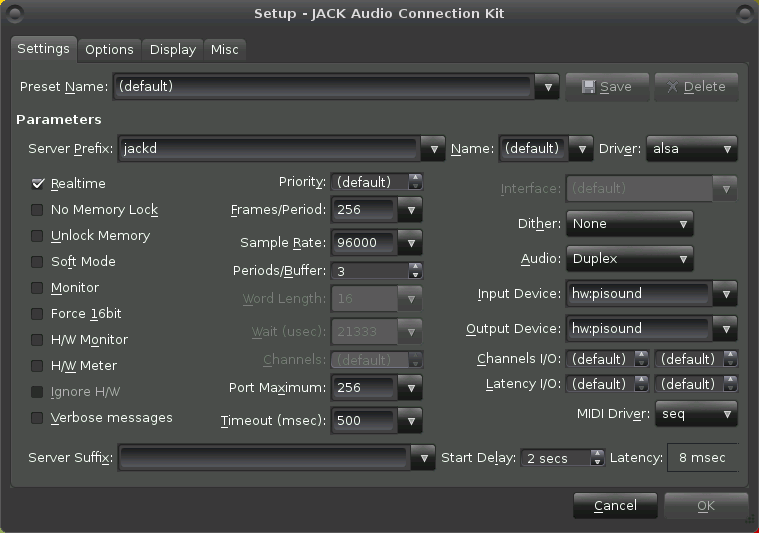
- Click Setup...
- Make sure that the following settings are set correctly:
- Sample Rate is one of '48000', '96000' or '192000'. (The higher the sample rate, the more there is data to process for software. However, higher sample rate has slightly less latency, if software is fast enough to keep up!)
- Input Device and Output Device both are set to 'hw:pisound'.
- MIDI Driver is set to 'seq'
- Close the Setup window.
- Click Start.
- If everything is fine, you should see 'Started' text written at the top left corner of the status area.
Note: If something goes wrong, try different settings in Setup, and make sure that the sound card is not being exclusively used by some other software.
How to use Sonic Pi with Pisound?
The latest version of Sonic Pi bundled with Raspbian Desktop works out of the box without any manual changes! Just start it from the menu -> Programming -> Sonic Pi!
If you don't have Sonic Pi installed or want to get it upgraded, then run these commands in a terminal:
sudo apt update
sudo apt install sonic-pi
How to send WiFi-MIDI messages to your Raspberry Pi?
TouchOSC2MIDI must be installed for this to work, you may get it installed using 'Install Additional Software' menu in pisound-config.
Making use of your phone or a tablet for controlling software on Raspberry Pi using Pisound is relatively easy, just follow these steps:
- Hold the button down for 3 seconds on Pisound to enable the WiFi hotspot mode, touchosc2midi starts also.
- Connect to "Pisound" WiFi access point using a phone or a tablet, using 'blokaslabs' as the password.
- Open TouchOSC, MyOSC or similar app on your external device.
- Host IP address in the app's settings should be 172.24.1.1
- That's it. From this point you can send messages from your phone/tablet to software running on your Raspberry Pi. The MIDI CC / Note number depends on the configuration of the app, for more information, see the TouchOSC documentation here
Note: If you want to to control PD patch with WiFi-MIDI messages, after completing the steps above, insert a USB stick with your patch files into your Raspberry Pi and click the Pisound button once to launch the patch!
Comments & Questions
For more tips & tricks join our community forums! 👋If you have any questions about the information on this page let us know below! 👇