Pisound App
The Pisound mobile app provides an easy way for you to control your Pisound-based projects with your smartphone or tablet.
The app communicates with a dedicated server running on Raspberry Pi & Pisound via Bluetooth. It is called Pisound Control Server (pisound-ctl).
The Control Server uses customizable module approach that allows listing different patches/scripts in predefined locations (usually /usr/local/...-patches)
and to selectively launch the patches/scripts in the appropriate software, making headless browsing and switching between patches ease, as well as executing custom scripts.
Furthermore, since version 1.03, the app's Pure Data module has an integration with TheTechnobear's MEC software, that means the Pure Data patches may have parameter controls whose values can be modified within the app, they can be used for display feedback from the patch to the app, and are MIDI mappable to external MIDI controllers! Read more about Pure Data module here.
The stdout and stderr outputs of the launched application are displayed in real time, informing the user on what is going on with the running application.
New modules may be added to support launching patches/scripts on more software, see the Customization section for more details.
Terminology
- Item - A unique script/patch that you can interact with within the app.
- Collection/Category - A set of scripts/patches that are managed by the same app module.
- Module - A set of system files that are used to interact with a single collection.
Software Setup
Raspberry Pi
First, make sure that Pisound is set up and that pisound-btn --version says it’s 1.05 or higher and pisound-ctl --version says it's 1.03 or higher. If it is not, follow the install instructions on Install The Pisound Software. The install-pisound.sh will update the software even if some previous version was already installed.
If using Raspberry Pi without built-in Bluetooth support, connect a USB Bluetooth dongle to it.
After everything is set up, pisound-ctl will get launched automatically and will be added to system auto start.
Android
Install the Pisound app on your device here, or download the apk directly here.
Why is the Location Permission Required?
As much as we hate excess permission requests ourselves, there’s no way we can avoid requesting this one. We don’t need or store your location information. It’s required for an application to declare ACCESS_COARSE_LOCATION permission in its Manifest for the application to be able to initiate discovery of nearby Bluetooth devices.
This is a new requirement since Android OS 6.0 - a nice summary of the issue is available here. And here's some more info on the new behavior.
Using the App
Connecting to the Raspberry Pi
Hold The Button on Pisound for 3 LED blinks (but less than 5 or the shutdown will get triggered instead) to make it discoverable to other Bluetooth devices. After a while (180 seconds by default), it will automatically switch off the discoverability and the LED blinking should stop. This needs to be done only for initially pairing your device to Raspberry Pi. Afterwards, if using same devices and if they weren’t unpaired, switching discoverability on is not needed, you may simply connect to the last used device. You may manually turn the discoverability off before it times out on Raspberry Pi by holding The Button for 3 LED blinks.
To connect to a new device, click 'Scan' in the initial screen and wait for nearby devices to be discovered. Once you see your Raspberry Pi in the list (usually raspberrypi unless you changed its hostname), tap it to connect to it. In case it didn’t appear in the list, make sure that it is in discoverable mode and you may pull the list down or click the button that appears at the bottom in order to manually initiate a new scan of nearby devices.
If when starting the app it had previously been successfully connected to some device, you may hit the Connect button to connect to that device.
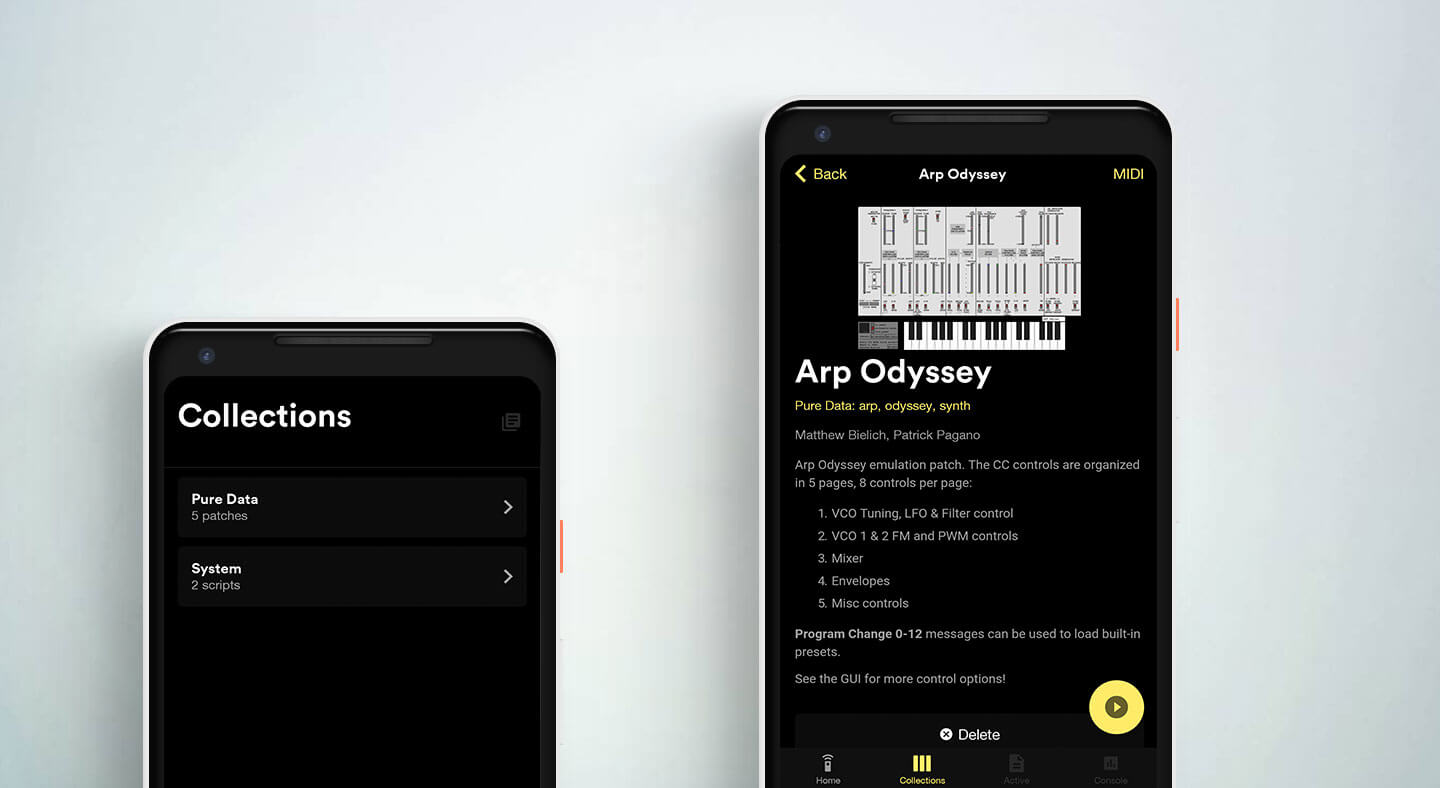
Displaying Collections
Go to the 'Collections' tab at the bottom to retrieve the categories of items. Click on single collection, e.g. Pure Data to get a list of patches.
Currently the app comes bundled with a set of great Pure Data patches to get you started, as well as some convenience System Scripts.
Launching an Item
Select one of the items and hit the start button at the bottom right to launch it.
The launched patch/script then can be reached in the 'Active' tab, and its console output is available in the 'Console' tab.
Deleting an Item
You may choose to delete the patch/script by clicking the 'Delete' button in the description view. A confirmation dialog will appear before the patch gets deleted. Be careful, there's no way to easily undo the action!
Importing Items from USB
Clicking 'Import patches from USB' in the Home tab will run the /usr/local/pisound-ctl/usb_import.sh script. It scans the connected USB media for folders like 'puredata-patches' in the media root, and imports it to the collection on the SD card (/usr/local/...-patches).
While import is ongoing, the app will display a console. Lines that say 'Importing ...' means a brand new patch was copied over while 'Merging ...' lines mean the patch was already in the collection and that it was overwritten.
Managing the Server
To stop the server from automatically starting on boot:
sudo systemctl disable pisound-ctl
To re-enable automatic start:
sudo systemctl enable pisound-ctl
Customization
The main customizable files are located in /usr/local/pisound-ctl/.
Adding New & Customizing Existing Modules
category_list.sh
This script is responsible for producing the list of categories supported in the app. The produced output should be paths to .yml files which describe the category.
You may add more kinds of collections by modifying this file and creating appropriate .yml file.
category.yml
The category yml file describes the category of items as well as provides a couple of scripts which are used to implement particular functions.
The fields in category.yml files are:
| Field | Type | Required | Description |
|---|---|---|---|
| name | string | Y | The display name of the category |
| description | markdown | Y | Description of the category |
| listing_script | path | Y | Path to _list.sh script |
| launcher_script | path | Y | Path to _launch.sh script |
| stopper_script | path | N | Path to _stop.sh script |
| detail_script | path | N | Path to _detail.sh script |
| delete_script | path | N | Path to _delete.sh script |
| opaque_item_mode | bool | N | If this is true, the entries printed by listing_script are not treated as files, so not double-checked for existence. Default false. This is useful when the items in category are not represented in a systematic way by distinct files (like pedalboards in MODEP) |
list.sh
This script should print the paths to the patch entry points or metadata files (usually the path to blokas.yml), so they appear in the collection view.
detail.sh
A script that outputs the metadata on the patch - usually it's enough to print the blokas.yml file for the patch, however, some more advanced uses may generate the data on the fly. YAML or equivalent JSON output is acceptable.
At the very least, 'entry' and 'name' must be produced.
--summary argument is provided when querying for information to be displayed in the Collections and Patch views, and it's omitted when retrieving the information for the patch just before starting it. This is useful in case time consuming dynamic scanning of the patch for features it supports is being done prior to being launched, so that can be skipped while simply browsing the patches list.
launch.sh
A launcher script for executing the item. It gets the item path in its first argument, and whatever was in 'args' attribute in the rest of the command line arguments.
stop.sh
A stopper script - executed when the user stops the patch. If possible, it may gracefully cause the patch host to exit or stop the patch. If it doesn't, the patch host gets killed. (which is fine in most cases)
Adding New & Customizing Existing Items
blokas.yml
The blokas.yml file describes the patch/script itself and contains info that gets displayed in the 'Patch View' of the app.
| Field | Type | Required | Description |
|---|---|---|---|
| name | string | Y | The display name of the patch |
| author | string | N | The author(s) |
| entry | path / string | Y | The path to entry point of the patch. Can be relative to blokas.yml. In case opaque mode is enabled for the category, this is treated as a string |
| args | string | N | Arguments to append to launcher script invocation |
| image | path | N | Path to the image to use with the patch. Can be relative to blokas.yml |
| description | markdown | N | Description of the patch |
| tags | string list | N | Tags of the patch |
| mec_controls | bool | N | Whether the patch supports MEC controls (puredata_detail.sh automatically guesses the value, this can be specified to manually override) |
| midi_keyboard | bool | N | Whether the patch should show virtual MIDI keyboard (puredata_detail.sh automatically guesses the value, this can be specified to manually override) |
Pure Data Module
If you haven't already, you can install Pure Data via pisound-config, in the 'Install Additional Software' menu.
The Pure Data patches are expected to be found in /usr/local/puredata-patches/. Each patch should be in its own subfolder. The legacy patches require the entry point into the patch to be named 'main.pd'. The new way of including patches is to create a 'blokas.yml' file in the patch folder which stores various pieces of information about the patch, including the name of its entry point.
Pure Data Patch with Parameters Tutorial
You may find a step-by-step tutorial on how to create a Pisound App compatible Pure Data patch here.
Patch Parameters and MIDI
Thanks to integration with TheTechnobear's MEC software, real time controls and MIDI mapping in PD are possible.
When a patch gets launched, the app connects all of the connected MIDI devices to the patch host, so you may immediately interact with the system, in case it reacts to MIDI messages.
To have the parameters displayed in the app, the patch must contain the parameter definitions and load the appropriate plugin.
The Pure Data patches must contain a [monorack patch_name] Pure Data object as well as the parameter definitions, named patch_name-module.json and patch_name-rack.json, described below in the same folder as the blokas.yml file.
The patch_name part must be a single word without spaces and must match between the monorack object and .json files.
Also, for convenience, the [monorack] object has a 'refresh' button visible in PD GUI to force reload of parameter definitions without restarting the patch. If after refreshing you don't see the expected changes, check for syntax errors in the definition files.
For the virtual MIDI keyboard to appear in the app when the patch is launched, it must contain [notein] and/or [r notes] object in some .pd file in the patch folder.
Parameter Definitions
The parameter definitions format is defined by the MEC software.
The syntax is JSON, so keep an eye on the ',' symbols - make sure the last entry of the group has no trailing comma, and all else do. It's best to write it using an editor with automatic syntax error checking.
...-module.json
This file holds the definitions for the parameters in the module.
Example file:
{
    "name" : "example",
    "display" : "Example",
    "parameters" : [
        ["float","tempo","BPM",30,300,120],
        ["bool","on","On",0]
    ],
    "pages" : [
        ["pg_main","Main",["on","tempo"]]
    ]
}
| Field | Description |
|---|---|
| name | Module name, used internally |
| display | Display name, for human consumption |
| parameters | Array of parameter descriptor arrays, see below |
| pages | Array of page descriptor arrays, see below |
Each parameter array entry consists of a subarray, containing the following fields in given order:
- Type, see below table for possible values
- Internal name, it is the symbol name that will be used to send and receive values in Pure Data, usable in PD via
[s name]and[r name]objects. - Display name
- Minimum value
- Maximum value
- Default value
The types fundamentally are float, integer and boolean. Some particular types imply a units suffix for display, but they are not used in the app.
| Type | Description |
|---|---|
| float | Real numbers |
| int | Integer numbers |
| pct | Same as float, with % suffix, use 0 and 100 for min and max |
| freq | Same as float, with Hz suffix |
| time | Same as float, with mSec suffix |
| pitch | Same as integer, with st suffix |
| bool | Boolean value, 1 means true, 0 means false. Minimum value and maximum value must be omitted in the parameter entry array! |
The parameter in the UI will have different appearance based on the type, in case the fundamental type is:
- 'float', the parameter in the UI will appear as a vertical slider.
- 'int', the parameter in the UI will have arrows up and down so changes by exactly 1 are easy to do.
- 'bool', the parameter in the UI will appear as an integer, with min and max values being 0 and 1 respectively.
- if the parameter internal name has a '_btn' suffix and is of bool type, then it will appear as a button.
The page entry consists of:
- Internal name
- Display name
- An array of internal names of parameters, that appear in the page.
Same parameter may appear in more than one page, also can appear more than once in one page.
We'd recommend using up to 8 parameters per page, but if you use more, the page will automatically be split into sub pages. Keep in mind that there's a character length limit for a page entry, so don't put everything into a single page.
...-rack.json
Holds preset and MIDI mapping information. Initially this file may be empty. As of 1.03, only the 'default' preset name is used. The 'default' preset gets saved when a MIDI control is mapped to some parameter. Saving and loading different presets will come in a later release.
Contribution Guide
The scripts used by pisound-ctl are available here.
You may submit pull requests with your modifications and additions. Preferred form of new categories would be deb packages, for an example, see MODEP integration scripts.
Comments & Questions
For more tips & tricks join our community forums! 👋If you have any questions about the information on this page let us know below! 👇